
Last updated: 29th September 2021.
In today’s article of ApolloX review, we will be doing justice to the crypto trading futures software and everything you need to know about the platform.
It is potentially promising that Cryptocurrencies are the best future payment system while Bitcoin being number one of them all.
Bitcoin currently has over a 24 hours trading volume of $31,474,656,878.94 and it continues to grow every day like that.
Crypto has also produced more millionaires than ever in the Bricks and Mortar world and that also contributes a lot to the shitting world and that is why everything is growing rapidly.
So it’s easy to say that it is indeed a great way to acquire wealth in the digital space if not massively but can help you quit your 9-5 job.
You might have seen its potential and that is why you are looking for an ApolloX review to begin your journey or you want to step up your game.
Anyone, you fall in the above, you have come to the right place.
Let us start the ApolloX Review immediately!
- What is ApoloX
- How Does ApolloX Work
- Register on ApolloX
- How To Trade
What is ApolloX?
ApolloX is a highly valued cryptocurrency exchange platform founded by a group of experts with a very solid background in tech companies, crypto exchanges, and other financial institutions.
The ApolloX company aims to make more and more users enter the crypto space. Not only for experts and the semi-expert but also beginners.
ApolloX discovered that there is always more room in the crypto space but getting in is not always easy for most beginners and that it provides an avenue for that.
The name being called ApolloX has been crafted since it was launched. The former first successful mission is to land a person on the Moon while the other one represents crypto exchange.
How Does ApolloX Work?
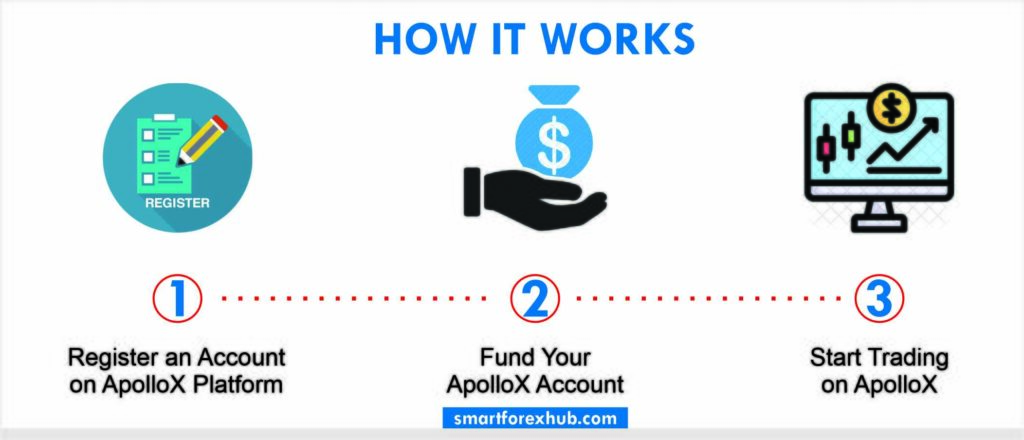
The first thing and foremost you need to register on the platform, signing up is very easy and we will still be practicalized in the next subheading.
After you must have registered and activated your account, the next thing you need to do is fund your account.
Luckily, the platform covers series of cryptocurrencies that you can choose from to deposit and start trading.
The above steps are just like a summary, the next chapter will cover each step deeply in the next chapter…
So let us start.
How To Set Up ApolloX
Here, we will cover how to sign up on ApolloX step by step and I have included a screenshot in it for ease of use.
Sign up is actually easy, you just have to follow the steps that are shared here, and also you need to keep in mind that the platform doesn’t know your customer verification (KYC).
Firstly, go to www.apollox.com and click on the register up to that the arrow is pointing to.
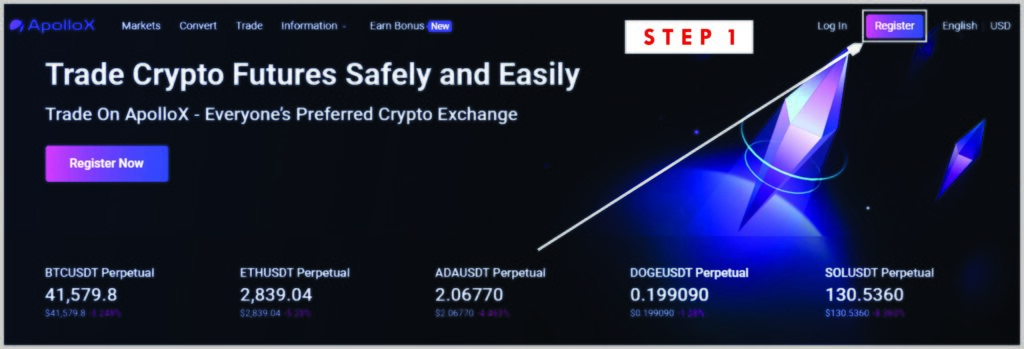
You will then be redirected to this page below.
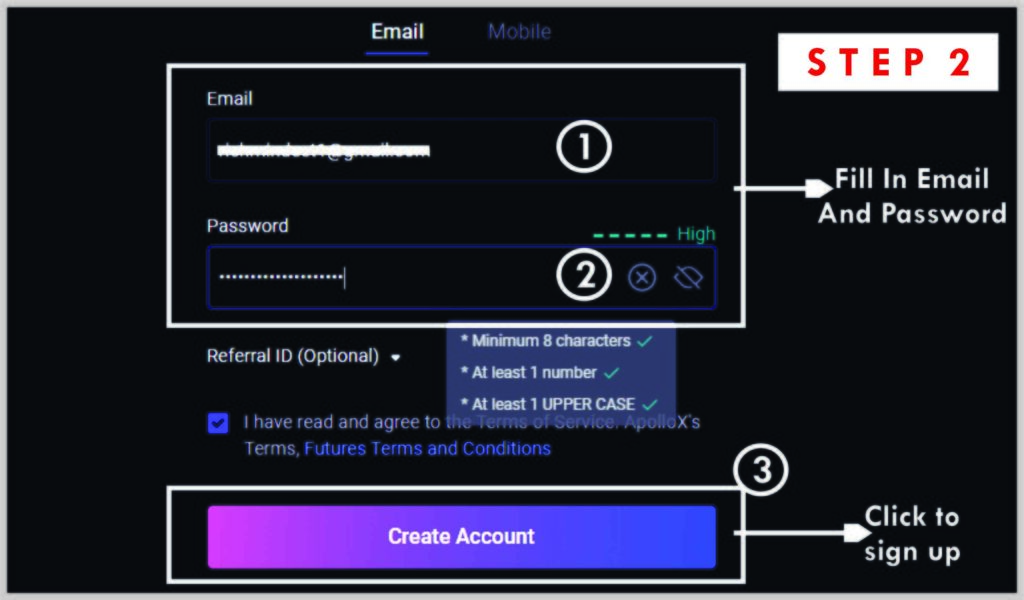
You will be required to put your desired email and password. Your password needs to meet up the following requirements.
- At least 8 minimum characters
- Add least 1 number
- At least one upper case letter.
For example.
The type of password that meets up the above-listed requirements can be something like Smartforex12345.
The above password is just like an example and it is not advisable to use such an easy to guess password.
Keep in mind that you can also sign up using your phone number and it is as simple as using your phone email.
If you want to use your phone number, you just need to click on the mobile number option as shown below.
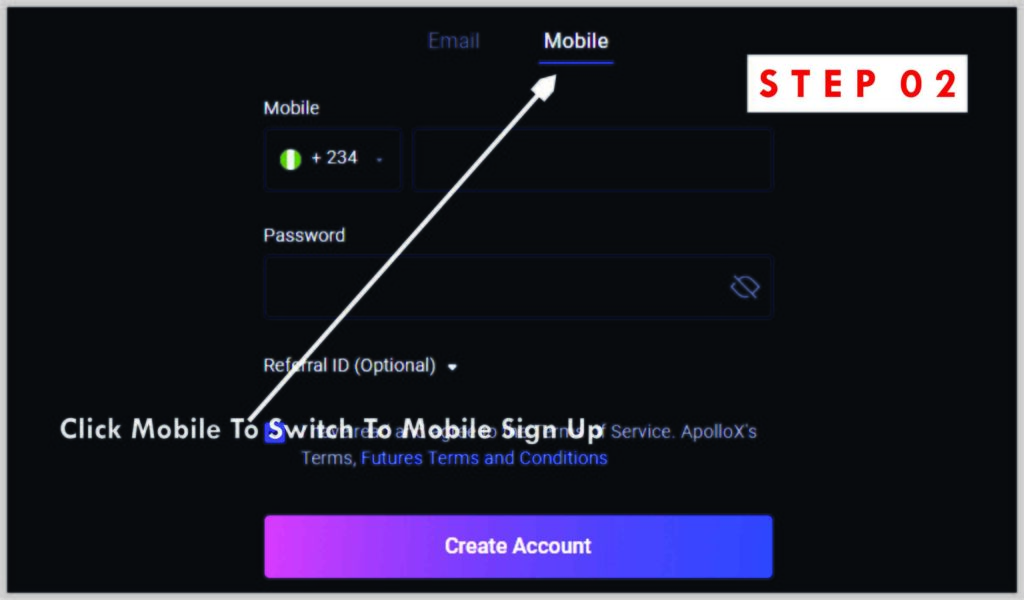
After you must have put your phone number or email, like the way above. Click on the “Create Account” button.
And this will pop up.
Security Cheeck
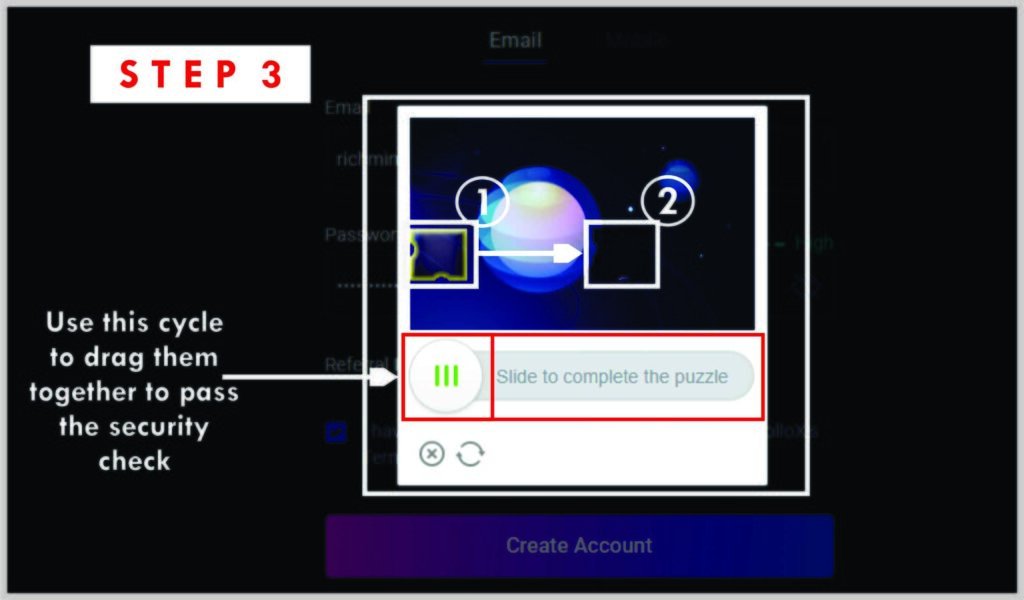
The page above is to prevent robots from accessing the system.
All you need to do is to use the slide button to let them meet each other. After you must have performed the verification brilliantly.
The platform will automatically say success and redirect you to this page below.
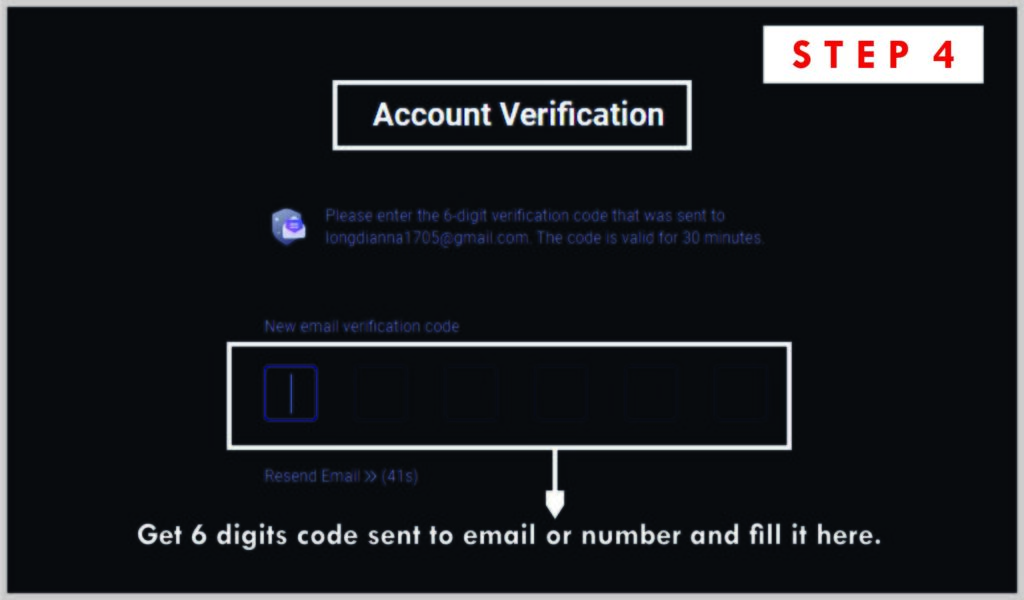
Here means that a code has been sent to either the email you use to sign up or the mobile number.
If you use email, just log in to your email provider and you will see an email like this.
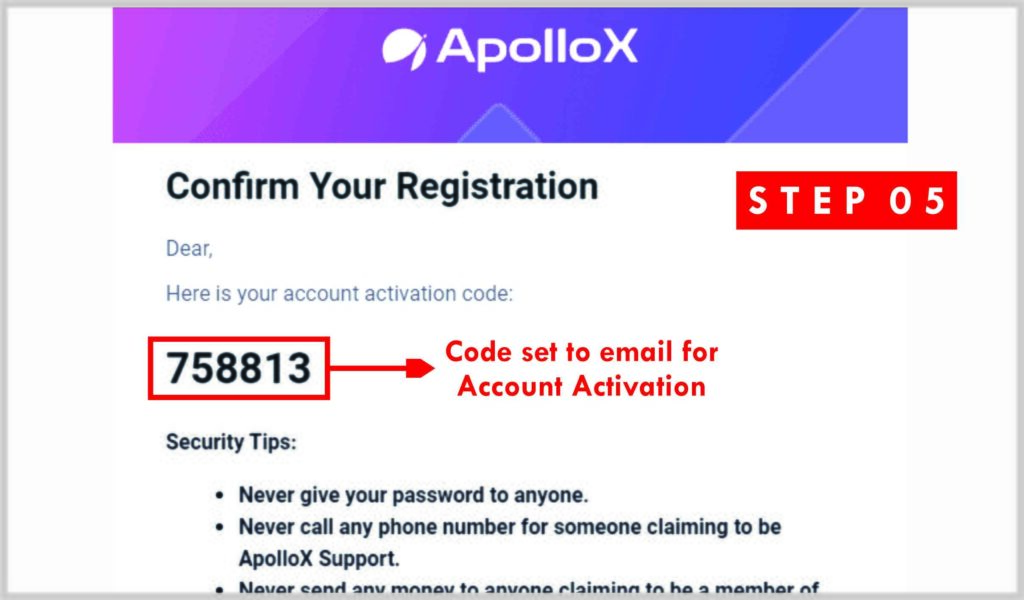
The email carries the ApolloX logo and “Confirm Your Registration” as a title and some security tips.
Copy the code above, like mine, was 758813 as shown above, and paste or type into the space provided, then you are done.
I want to say congratulations because you have just created an account on ApolloX.com.
But before you deposit funds or start trading, the first thing I recommend you to do is ensuring the security of your account.
ApolloX Account Security Set-Up
Follow the steps by steps below to set secure your account on ApolloX. I have included screenshots in each step to make it easy for you to follow.
If you follow what is shared here, you won’t have a reason to get any step wrong.
So, let us start.
Firstly, click on the account icon as shown below.
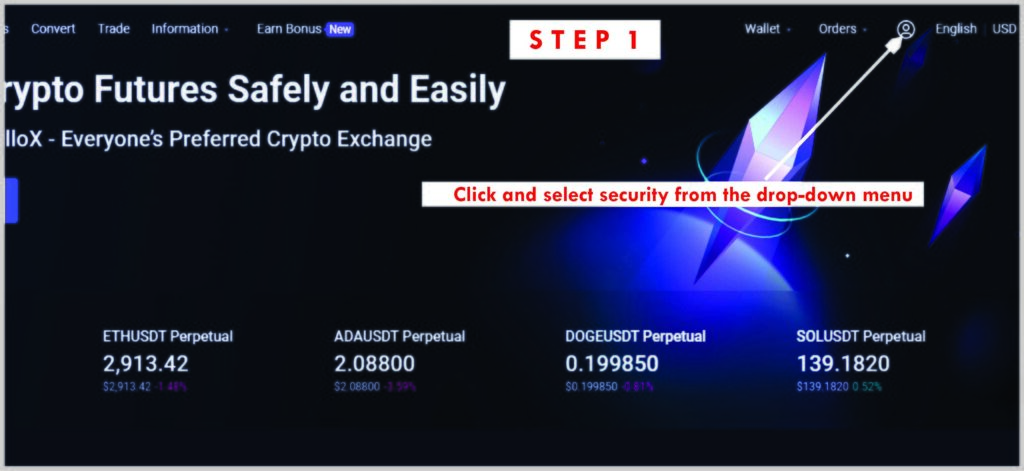
A drop-down menu will come down and then select security.
You will be redirected to the page below after you must have clicked on Security in the drop-down menu.
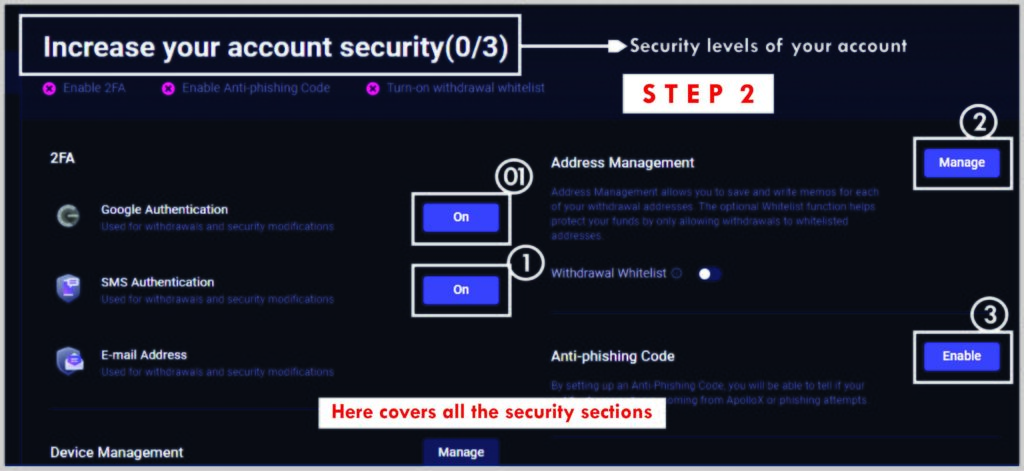
You will have a chance to set up up to 3 levels of securities on your account.
Let me quickly explain what the security aspects look like.
- 2FA Security: This aspect will enable you to enable 2FA on your account, it means you can either secure your account with the phone number or Google Authentication App.
- Address Management: You will be able to save a list of cryptocurrencies addresses here mainly for withdrawals. This will prevent anybody from just log in to your account and just withdraw your funds.
- Anti-Phishing Code: This will help you to determine if your emails notifications are coming from ApolloX or from a phishing website.
Here is how to get the steps above done.
While you are still in the security section as shown above, first click on the SMS verification and you will be redirected here.
Phone Verification
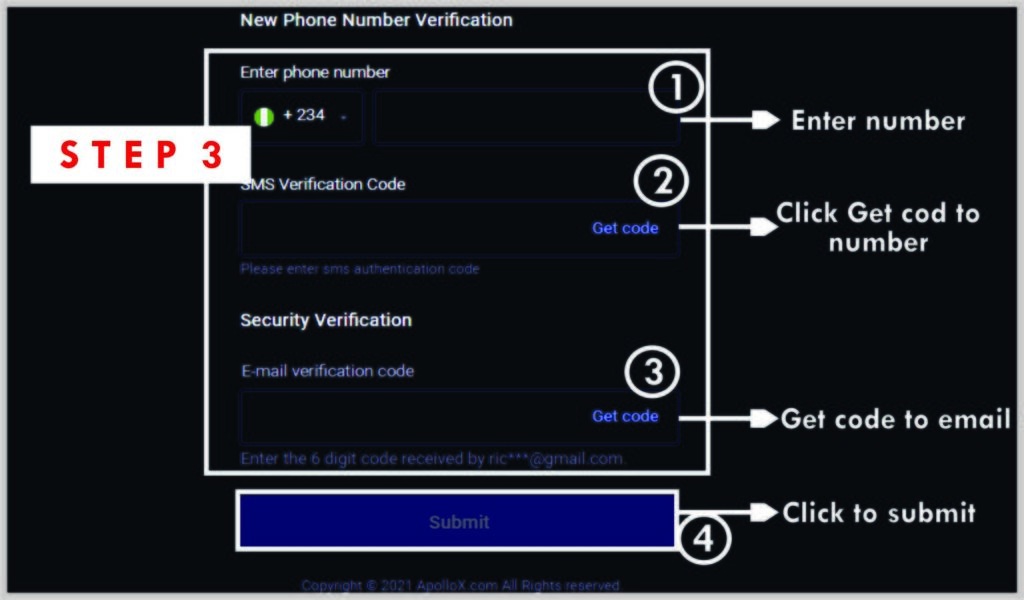
From the page above, you will be able to enable 2FA (Two Factor Authentication) on your account.
What you need to do is first put your phone number in the “SMS verification code” and click on “Get Code”.
A 6 digits code will be sent to your phone number. Get the code and put it in the space provided for the phone number verification.
The next thing to do is to get code from the email you registered your ApolloX account with.
A 6 digits code will also be sent to your email, get the code sent to your email and then insert it there.
Click on submit!
You have just enabled 2FA security on your account.
The next thing is the Adress Management.
Click on the “Manage Button” and then a page below will pop up.
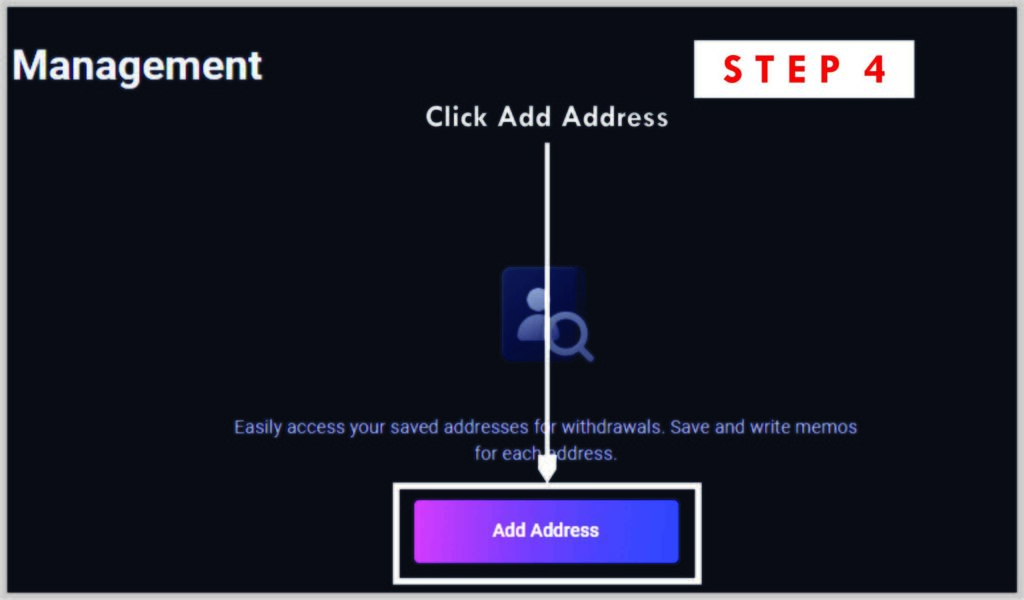
Because it is new, you won’t have any address listed here yet. Simply click on the “Add Adress Button” and this page will pop up.
Address Whitelist
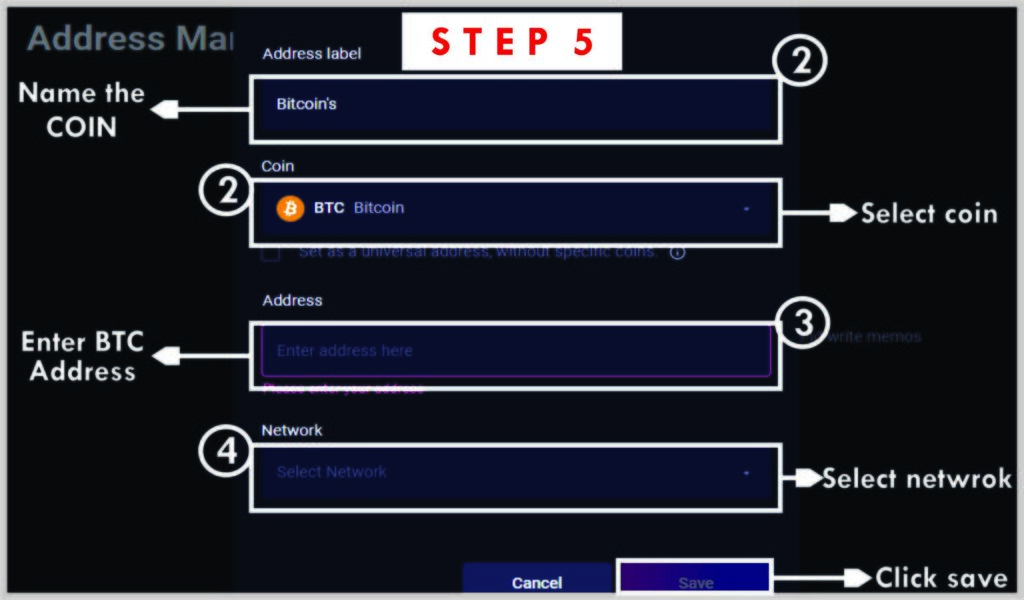
The first place is the address label. What it means is that a unique name you want to identify each address added with.
As you can see above that, I labeled mine “Bitcoin’s” so as you can label your own anything that you want or think is okay by you.
The next box carried a tag of “Coin”, you just have to select that box and a drop-down menu will come, simply select the coin name you want to add.
The next box is address, this is where you will paste your Bitcoin Address to. You simply generate the address from your cryptocurrencies wallet provider.
You paste it there. If the address is valid according to what you selected as a coin, it will accept it but it doesn’t.
It will bring a red sign that this is not a valid address network.
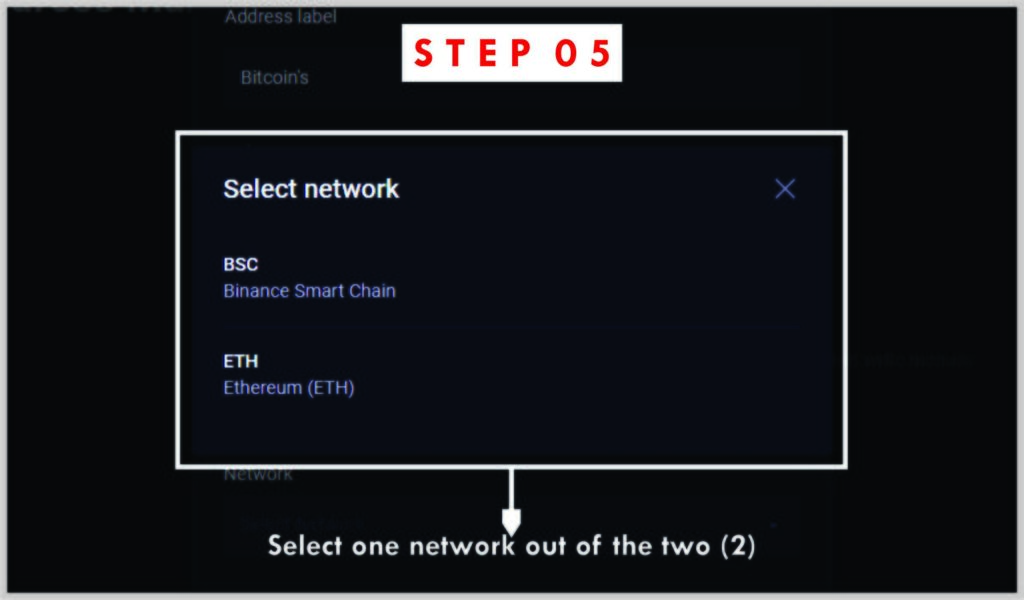
The next section here with the tag “Network” means you will be able to select a network provider your fund is coming from.
The 2 networks specified there are
- Binance Smart Chain (BSC)
- Enthereum (ETH)
Take a look for yourself below.
After selecting the Network and everything looks good.
Click on Save and you will be good to go.
Repeat the steps above to add more cryptocurrencies addresses.
The next thing is to enable Anti-Phishing Code which your emails notifications will carry.
Firstly click on the enable button.
Photo
You will be redirected to the page below.
Anti-phishing Code
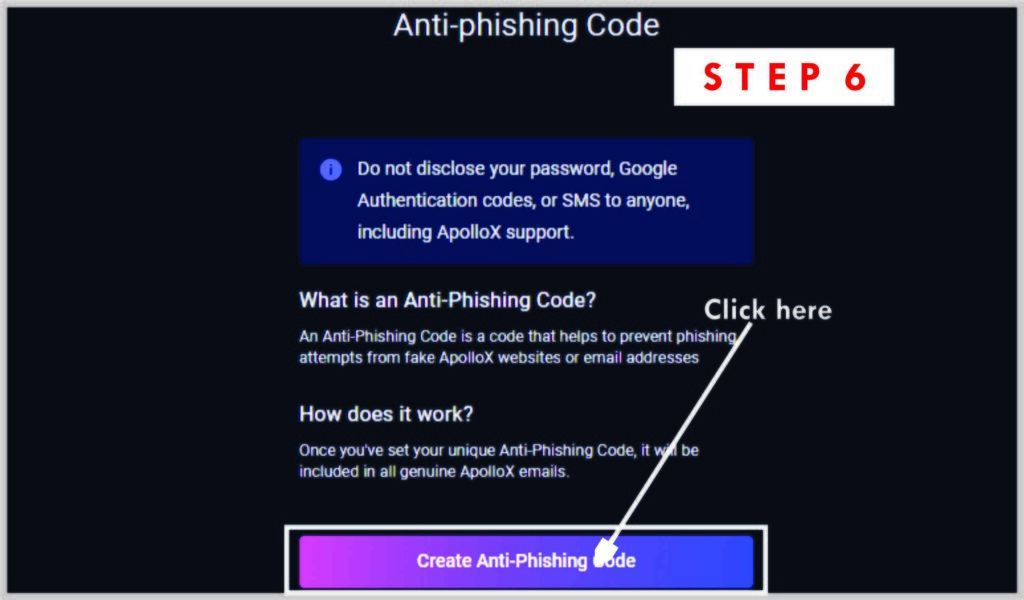
Hit the “Create Anti-Phishing Code”
A page like the one below will pop up and you will be able to put your preferred “Anti-Phishing Code” like the way I did below.
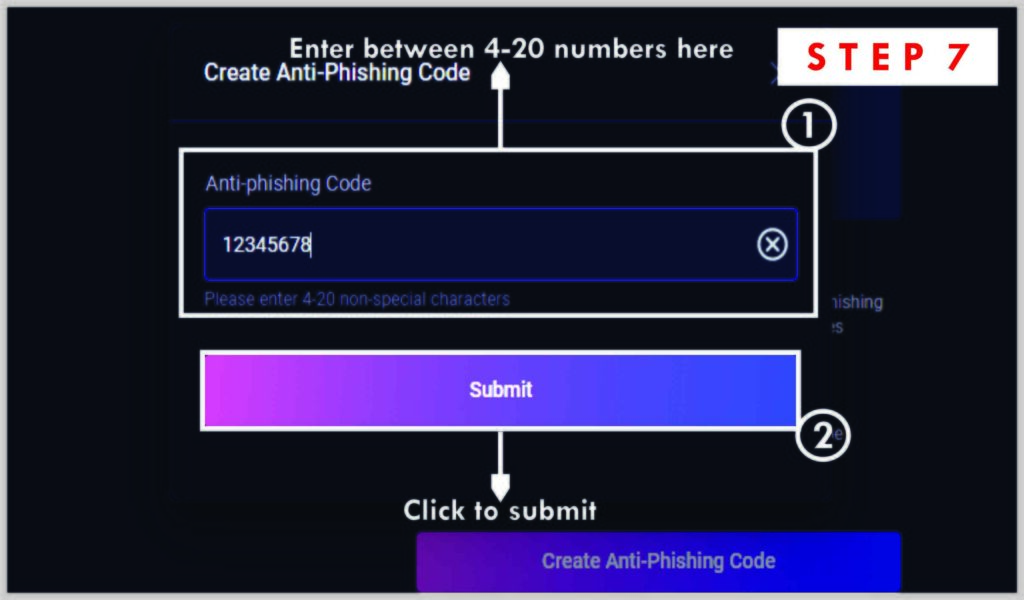
An example of the code that I insert there is “12345678” as shown above after you insert the code. Click on the submit button.
I want to say congratulations again because you just saved yourself from scammers who might want to attack your account.
And that leads us to the next chapter.
How to Fund Your ApolloX Account
This section covers all you need to know about funding your ApolloX and trust me I have explained the steps in detail, screenshots included.
If you have been following you will be discovered that ApolloX currency support only 2 cryptocurrencies network. Which are;
- Binance Smart Chain BSC (BEP20)
- Ethereum-Based Network (ECR20)
What it means is that if you must trade or fund your ApolloX account, you must have one of the supported networks.
Note: You can’t select the Binance Smart Chain network and then send money to your account from your CoinBase App.
It will be permanently and automatically lost in the network and ApolloX won’t be able to help you sort it out either.
So let us start!
Firstly, select wallet and select funding in the drop-down menu.
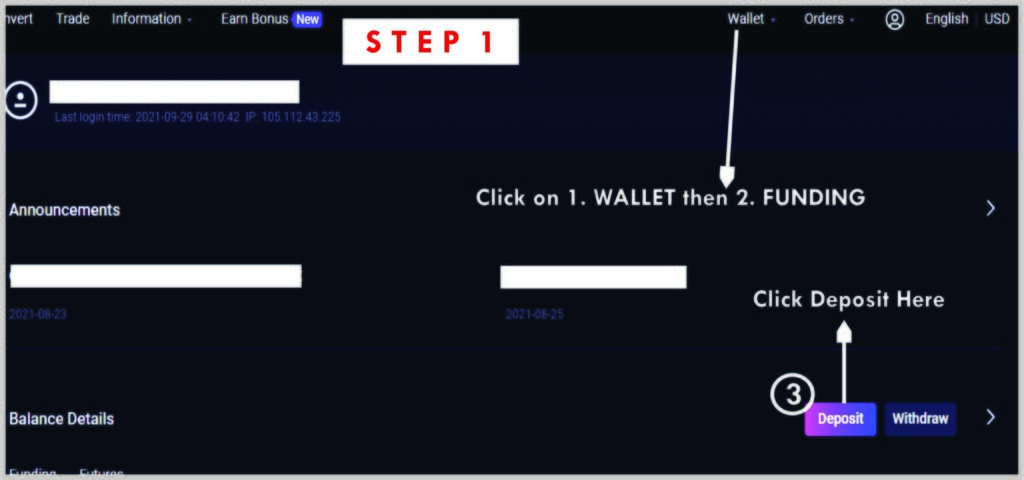
And click on Deposit as shown above.
You will be redirected here.
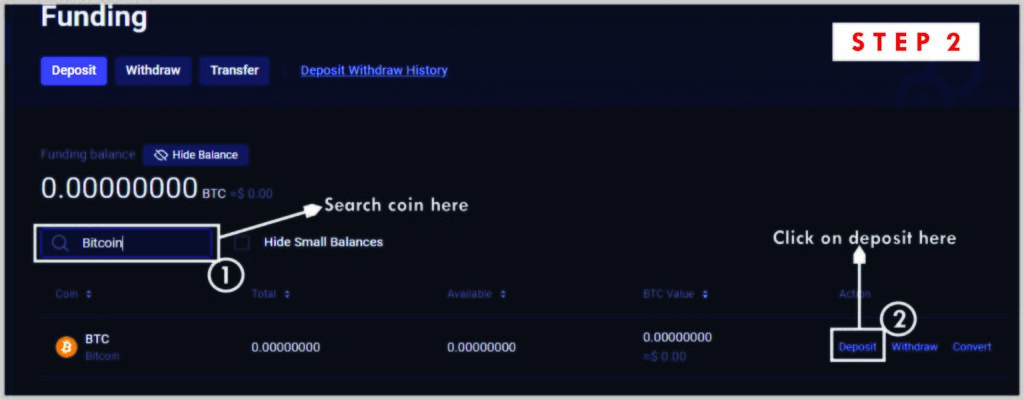
You will be able to search for the coins you want to deposit using the search button as you can see above that I searched for Bitcoin using the search bar provided by the platform.
The next thing you need to note over there is that you need to select the action you want to perform.
So select the “Deposit” option as the arrow is pointing. You will be redirected to the page below after you must have clicked the deposit button.
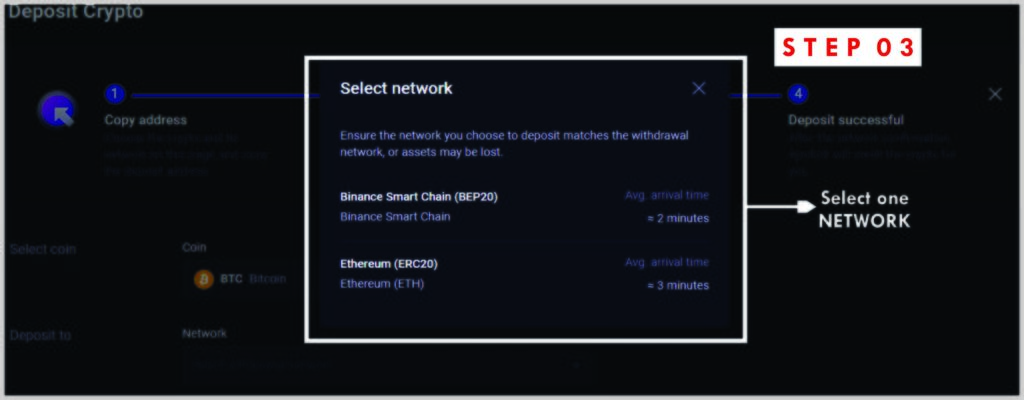
A page will pop up asking you to select the network you are sending from out of the 2 networks supported.
Select your preferable network from the two and you will be redirected here.
Getting Address
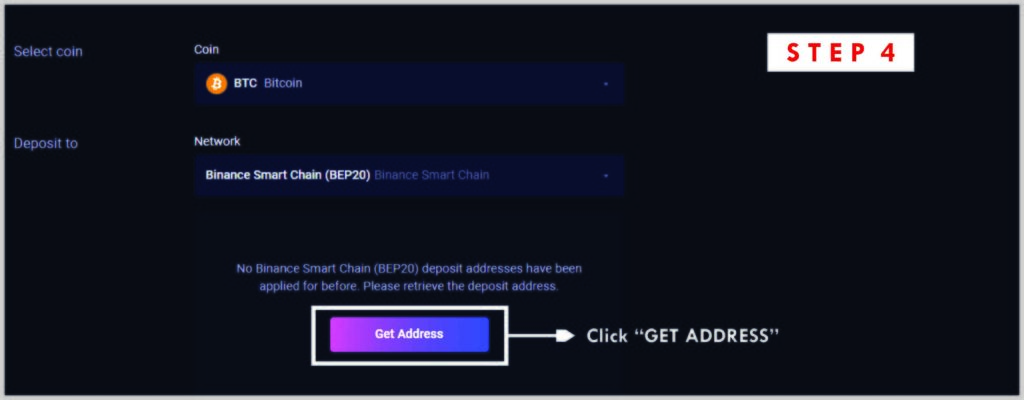
After you must have select coin and network, the page above will be displayed.
If you have already generated an address before now, you will automatically see an address there you can use but since this is the time you won’t see it.
So click on the “Get Address Button” and you will be redirected to the page below.
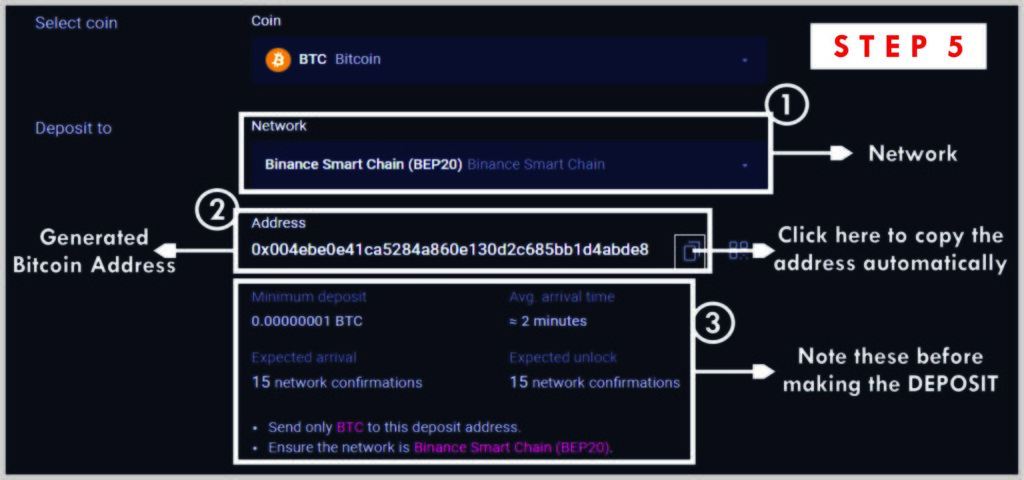
You can see that an address as being provided for you as you can see above. Click on the copy button to copy the address and take it to Binance Smart Chain for funding.
Note the arrival time says 2 minutes, so if after 5-10 minutes you don’t see the coins displayed or credited to your account that means you have done something wrong.
Also, note the below message that says
- Send only BTC to this to this deposit address
- Ensure the network is Binance Smart Chain (BEP20)
The statements above are based on the settings selected while in the process, so it is advisable you check that first before you continue.
Repeat the same process to add more funds to your account.
And that leads us to the next chapter.
How to Open Trade on ApolloX
So the purpose of you following this “ApolloX review” is for you to learn about the platform and as well start trading.
You will learn how you can start trading here.
Let us start!
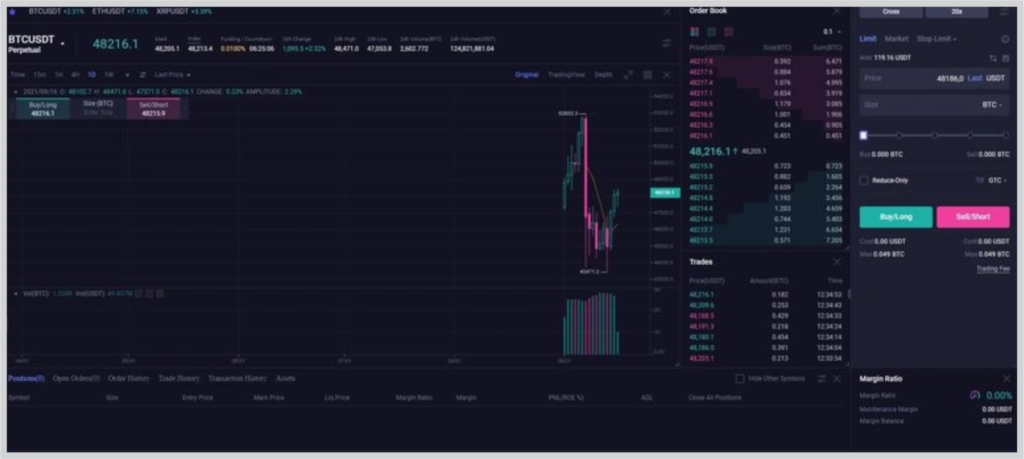
The first thing you need to know is that the trading interface is very easy to use and navigate around.
I will be giving the steps in theory here while you do the practical at your own end.
Firstly, at the top left-hand corner, you will find a drop-down menu.
This drop-down menu will enable you to select from the wide range of the available cryptocurrency pairs.
Note that as at the time of writing this article, the platform only supports the cryptocurrency pairs below.
- XRP/USDT
- SOL/USDT
- DOGE/USDT
- BTC/USDT
- ETH/USDT
- ADA/USDT
The reason for the USDT pairing all is because USDT is the acceptable coin on the platform at the time of writing this article.
Note: The above-listed pairs are a set of perpetual contracts.
Or you can say a type of derivatives futures contract that makes it possible for you to open and close trade without an expiration trade.
What it means is that you can’t trade an underlying asset itself but a contract that is specifically built to track its price.
It is safe for those who plan to speculate on the price of different cryptocurrencies with or without leverage.
The team behind the ApolloX platform also promises to increase the trading pairs in the near future.
ApolloX platform also features a trading chart, order book panel, recent trades, and the likes.
Using Leverage on ApolloX
Firstly, you need to understand what leverage is if not deep but have a bit understanding of what it does and how it works.
So what is leverage in trading?
In a word, leverage means borrowing funds to open trade a position that is higher than your current cash account balance.
The exchange platform lends you money to the trader to trade.
But the money the exchanges borrow the trader depends on the cross-multiplier the trader decided to use.
The ApolloX platform offers up to 100X on its leverage BTC/USDT contract.
This means that you can open up to trades position up to 100 times what is on your account.
For example.
If you have $200 in your account, you can open a position worth $20,000.
This trade will be something like BTC/USDT of the said $20,000. However, you need to be extra careful.
Because of the fact that this gives you an opportunity to earn more money, it also carries a very high risk.
And that is because if the trade mistakenly moves in the direct position of your trade for as little as 1%, you will be margin you have posted.
And this also has the potential to liquidate your entire account. That is if you are using cross margin although.
It is very very advisable to always use less than 5% off when it comes to leverage.
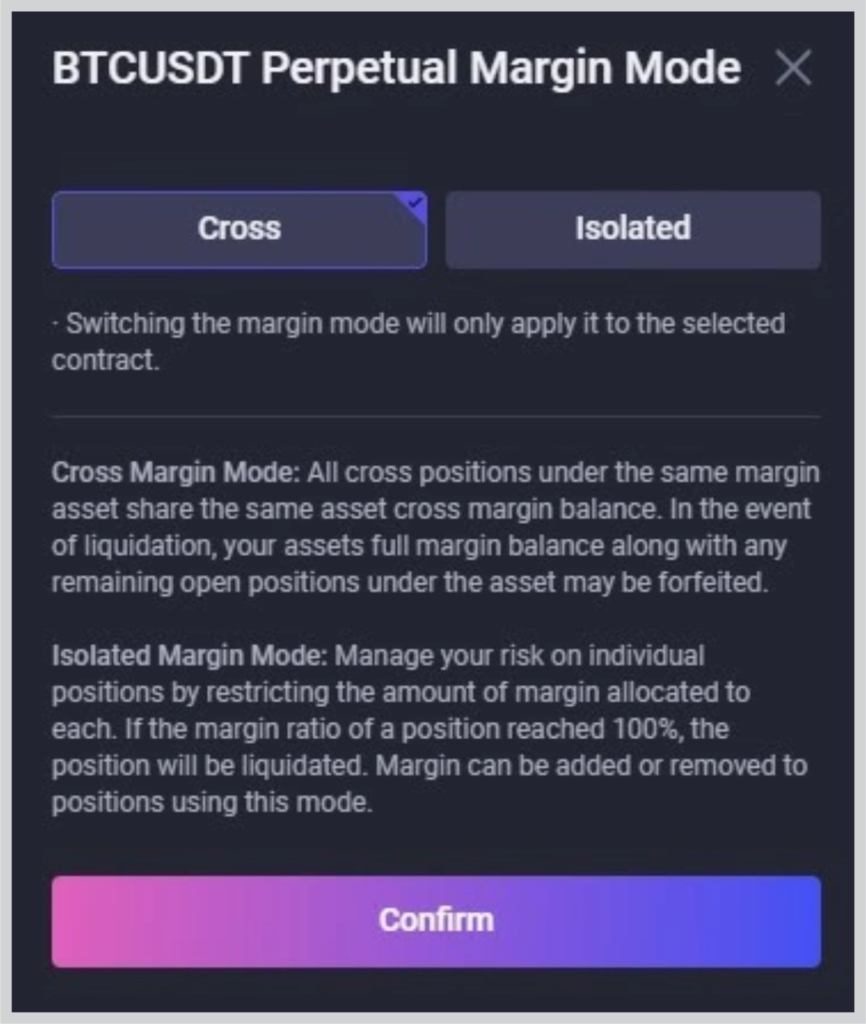
And this takes us to the different types of margins on the ApolloX network.
There are only 2.
- Cross Margin
The cross margin means that all the positions under the same asset share the same margin.
When it comes to liquidation and you use a cross margin.
You will only see the particular margin you posted for the specific position.
By using the “cross margin”, you will also lose other positions you have currently open.
- Isolated Margin
There is not much under this isolated margin, what it means is that you will be able to manage your risk on individual positions.
This is possible by restricting the amount of margin allocated to each.
Different Type of Orders on ApolloX
We will be using this section to look at the different order types on the ApolloX network.
Firstly, what is order type?
Order type can be seen as a set of instructions of instruments guiding a trade.
This can also mean an instruction giving to a broker platform to buy or sell a security on behalf of an investor.
And the ApolloX network supports a few of them which we will be listed below here.
The order type you choose will depend on your trade strategy and the purpose of the trading.
The ApolloX order includes:
Stop Limit Order
This order type is one of the most popular orders in the trading industry.
This is simply a set of conditional orders imposed on trade to execute a position during a particular time.
This can simply mean that a trade should be executed once the asset reaches a particular specific price.
The current open position (assets) will either be both or sold once it reaches the selected stop price or at a more considerable price.
This is particularly used for the popular stop loss (SL) and take profit (TP) that you would know or hear about before now.
Market Order
The market order means the simplest type of order.
It gets filled right away once the best price is currently available on the market.
Generally, the market order normally requires liquidity to be filled and it only gets executed based on the instructions on the order limits that were previously placed on the order book.
Stop Market Order
The stop market order is used to stop an order once it is triggered by the system.
The way it works is that once order gets triggered, the system bots will automatically terminate the trade.
This is also used in terms of stop-loss (SL)
Trailing Stop
The trailing stop is a proper instruction used by experienced traders.
The way it works is that a trader can set instructions for an order to stop after the order must have gone through specific significant corrections or callback.
Once the order gets to a specific highest price or the lowest price, the order gets triggered and the system stops it.
However, it is for experienced traders and not beginners.
Limit Order
This makes it possible for you to place an order at a specific price or at a favorable price.
However, what you need to keep in mind is that, there is no guarantee you will make money.
How to Open a Position on ApolloX
So how do you open a position on ApolloX?
To open a position means to enter a trade.
However, for the same of this tutorial, we will be using BTC/USDT as an example.
So we will be opening a position with “Market Order” on the BTC/USDT perpetual.
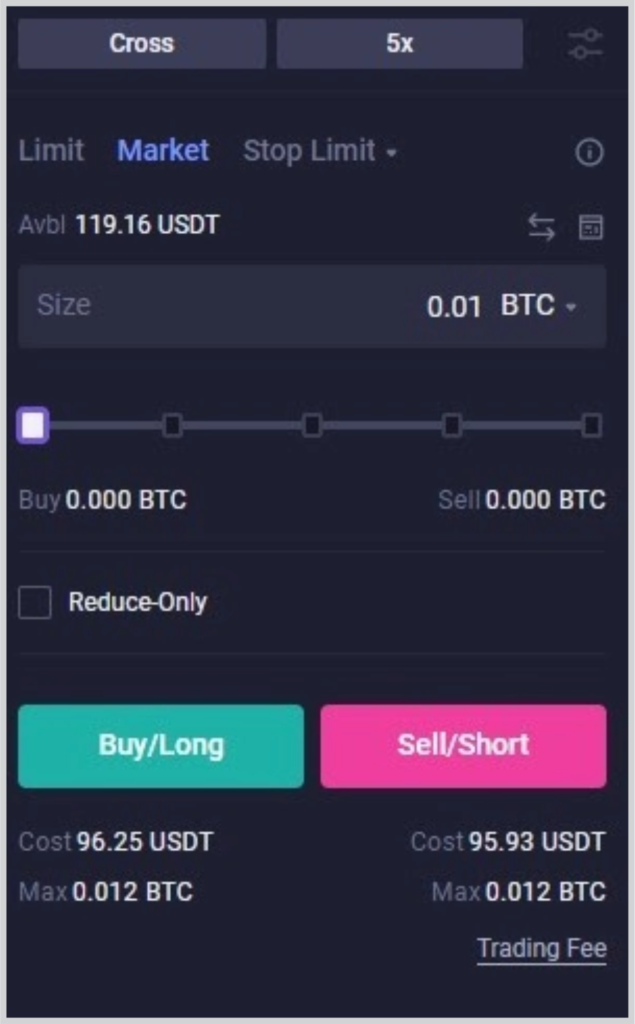
The above image shows how the specifications look like.
As you can see that we use cross margin and X5 leverage. That position size is also 0..01BTC.
Immediately we hit the buy button, the position will be open and then displayed under the market chart.

Using the chart section, you can track all your trade positions.
It also shows you all the important information such as:
- Position’s size
- Market price
- Entry price
- Liquidation price etc.
For the liquidation price means if reached, you will see the trade positions you have opened automatically closed and margin liquidation.
The automatically closed can also be seen as TP (Take Profit).
In addition, you will also be able to see some things like margin posted, margin ratio, and the likes.
How to Close A Trade Position on ApolloX
Firstly, what does it mean to close a position?
Closing a position means stopping or canceling out an existing trade position in the foreign market by taking the opposite position.
Short sales in position mean buying back the security WHILE the long position means selling out the security.
In order to close a position on ApolloX, you have limited options available.
You can do so in any of the following below.
- Through a market order
- Limit order
- Stop limit order
For example.
The below trade will be close using a market order.
You can find it right where you track your trade position.

In addition, by clicking on the market button. You can directly close a position.
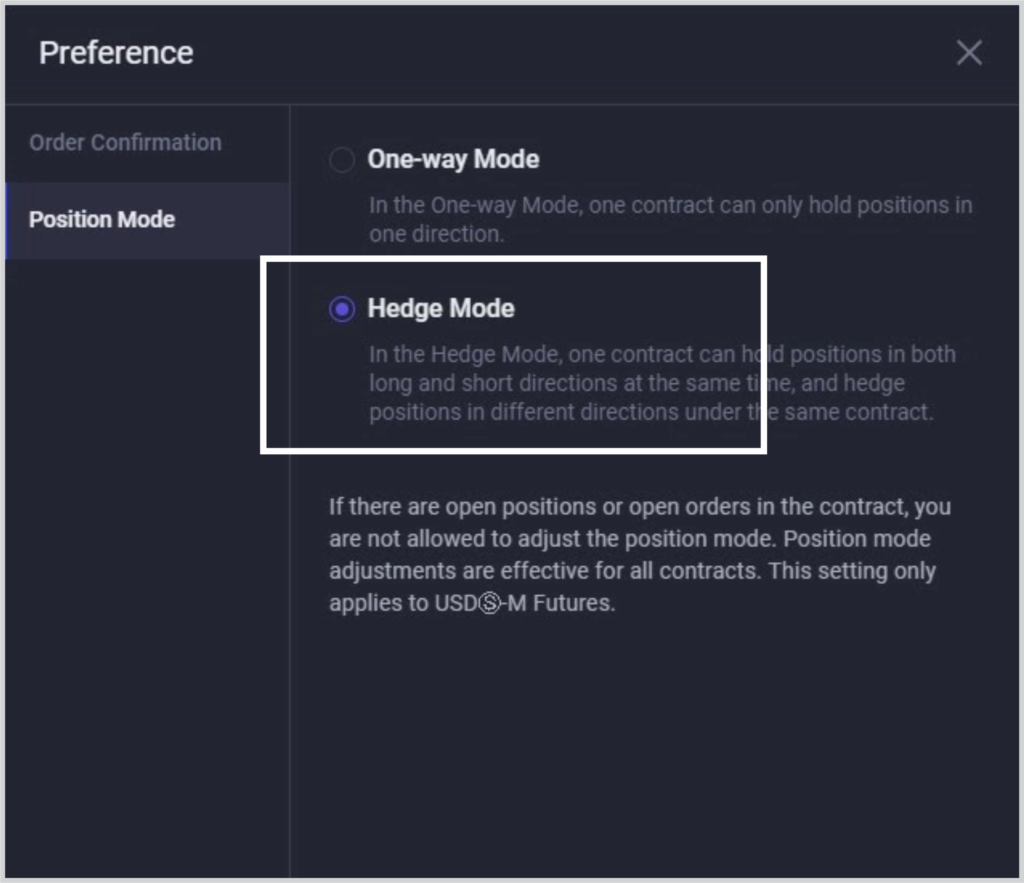
What is ApolloX Edge Mode?
What is edge mode?
The apollo edge mode means one contract can only open one position in a direction.
Example
You can only open one USDT longs or USDT shorts.
It is not possible to open both at the same time.
However, with the edge mode section, you can hold positions in both longs and shorts at the same time.
And as well edge positions at the same time under the same contract.
I must say that this is one for advanced and experienced traders and can also be used to protect the downside.
By default, the edge settings of your ApolloX account are in one-way mode.
So in order to activate the edge mode, click the button on the right-hand side of your leverage preference.

After that, you need to select
- Preference
- Then Position Mode
- And then Edge Mode.
ApolloX Fees (Withdrawal & Deposit)
The first most interesting part about the platform is that all the deposits are totally FREE of charge.
If you are to withdraw from any crypto wallet provider there are going to charge you a network fee including the popular Blockchain itself.
The same thing applies to ApolloX.
What it means is that there are standard networks fees that apply to you whenever you want to make a withdrawal on the platform.
Note: As of the time of writing this article, you can only withdraw USDT on the platform while you can deposit any other types of cryptocurrencies.
The official statement on the website says “We will only support withdrawals in other cryptocurrencies once there is demand for it.”
Luckily, USDT is a very very stable coin so you can ensure the safety of your funds without the fear of it going down overnight.
If you try to withdraw funds in other cryptos, what you get is withdrawal suspended as you can see below.
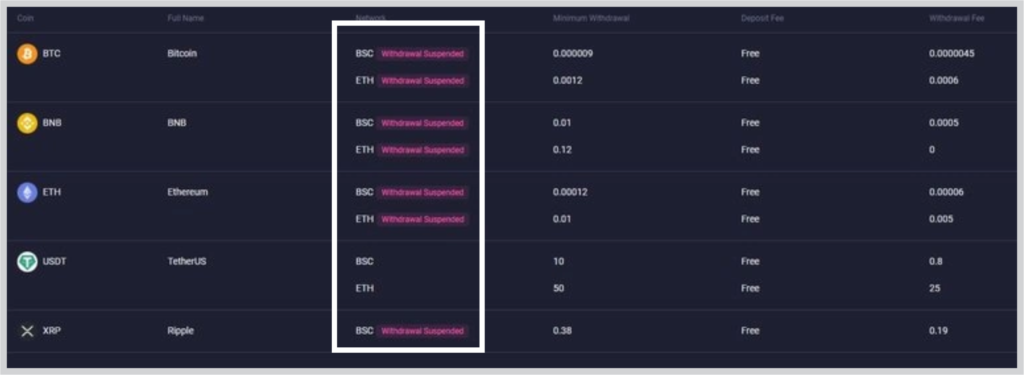
However, you can always deposit other types of cryptos as I have said before.
One thing you should take note of again is when trading derivatives, the funding rate.
The platforms show you the real-time funding rate as well as your funding rate history.
This can also help you study the possible funding rate over time.
Apart from the above statement, the platform charges:
- 0% Maker fee
- 0.8% Taker fee.
Is It Safe To Trade On ApolloX?
I have personally take my time to check online forums, communities, and other related blogs that have wrote about ApolloX
And there is no bad information that the platform has engaged in any bad activities.
I also checked some of the most popular and trusted online review website like Trustpilot but has no bad reviews and shows the site is safe to use.
And I do understand the fact that on cryptocurrency sites it can be tricky to know the legit ones and that is why you want to know who is in charge of your fund.
There is even a popular saying in crypto word that says “Not Your Keys, Not Your Bitcoin” having this in “MIND” means that you only need to keep what you are trading with on a site.
Why it is advisable is that you don’t have control of the platform unlike your TrustWallet or CoinBase account that you can log in anyhow.
Although this statement is NOT true about ApolloX.
As you can also in the previous steps that I have shared above that the platform has really taken lots of measures to the safety of your account.
Part of these is:
- Two factors authentic (2FA)
- Address Whitelist
- Anti-Shaping Code.
ApolloX Customer Support
Firstly the platform doesn’t just have a great customer support help center but also has social media communities on different platforms.
It has also a very popular crypto social media account which is Telegram.com.
Telegram is the number one largest social media-based for crypto traders and users.
But you need to note that there are also lots of scammers on the platform so it is not advisable to deal with anybody over there than the support you are there for.
The platform also has communities on sites like:
Note: I have included links to the ApolloX communities on social media platforms. Just click on the above to join.
You can also contact ApolloX by submitting a ticket to the help center here and the team will reply to you as soon as possible.
In addition, the platform also has a comprehensive faq page where you can find answers to all your possible questions.
It is also advisable to go through them to get a piece of more comprehensive information about the platform.
ApolloX Review (Pros & Cons)
You will learn all you stand to gain for using the ApolloX platform and the other way round also.
Let us explore them!
Below are the pros of ApolloX that this “ApolloX Review” article outlined.
#1: Liquidation Insurance Fund
ApolloX provides liquidation insurance funds. Firstly, liquidation itself means converting assets into cash.
But when it comes to futures trading like that of ApolloX, liquidation is what you need to try to avoid as much as possible.
And that is because losing positions are forced-exited to prevent the traders from falling into negative equity.
The platform understands this and that is why they have a system that is designed to make up for losses incurred when the user’s gross margin.
Asset minus liability that is less than 0.
With this system, you are in a safe hand when it is being done properly.
#2: Intuitive trading interface
The platform provides an intuitive trading interface that will help you to quickly negative around the platform by pressing a few clicks.
This is really good for beginners or someone who is new to online trading.
As you can see in some of the examples and steps I have given above, it is very easy to follow and apply.
By playing around within the platform for 30 Minutes – 1 hour, you should be able to understand how everything works.
This also helps the platform stand out among its competition.
#3: Sufficient Order Types
The platform provides sufficient order type which means you will be able to make many orders at a time.
Unline other platforms, that provide limited order.
Limited order can be seen as a specified price to buy or sell a security in the foreign market.
For example.
If a trader wants to buy XYZ’s stock but has a limit of something like $14.50, they will only buy the stock at a price of $14.50 or lower.
This prevents traders from buying more securities in the market.
But it is simply not like that on the ApolloX because the platform offers sufficient order type.
Cons of ApolloX
#1: Low Trading Volume
This is the number one problem I have seen about the platform.
However, it would not be a problem if you are not trading a high level of securities daily.
So what is low trading volume?
Low trading volume is that of a trade that typically has a low trading volume of 1,000 shares or less.
This set of trades may belong to little-known companies that trade over the counter (OTC).
As I have said earlier, it is still bearable if you are not trading in volume daily.
#2: Trading Pairs Amount is Limited
The trading pairs on the platform are still a little bit limited and this is similar to what is above.
Trading pairs can be seen as a situation whereby you have 2 currencies that can be traded over one and another.
For example, if you are want to buy Bitcoin with the dollar, the trading pairs will be USD to BTC.
The platform still covers popular ones for now and it is possible it add more currency pairs as time goes on.
Final Thought
The ApolloX is a great platform for both beginners and experienced traders and can be used in restricted countries of trading.
It provides a very easy-to-use interface making it easy for you to quickly navigate around the site without stressing yourself out.
It also provides high sufficient trading tools and it is indeed a great way to scale your trading experience.
Now it is your turn, what did you think about the ApolloX trading futures platform?
What did you think about this “ApolloX review” content?
Did you find any steps difficult or do you just have any questions about the platform?
Do not hesitate to use the comment section below.
If you also find this ApolloX review article useful, consider sharing it on your social media account because someone might also need this.